– Click LIKE above, if you like this post  –
Have you ever rendered with Depth of Field effect in V-Ray?
Render Time increase significantly, especially if you use high subdivs values (in the sampling rollout) to reducing the graininess. In this case the time increases even more. First of all I wanto to clear that I prefer  to create such effects in postproduction, but in this post I’ll tell you how to render faster with DOF directly in the V-Ray.
Here is a simple Dof example:
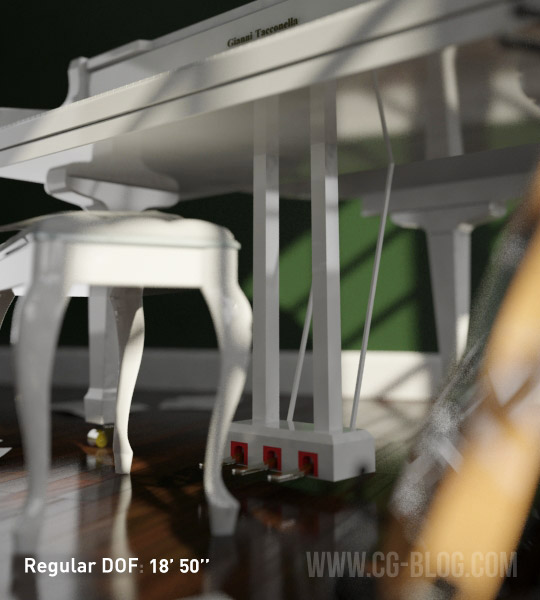
These image takes 7-8 mins without Dof, and the same image takes 19min with Dof and subdivs = 15: time is doubled! In this case the difference is just 10 mins, that might be irrilevant. But what happen if render time increase from 5h to 10h? It’s better to know this trick to go faster with Dof 😉
It’s a simple trick: we can reduce time calculation with Shademap feature.
OMG… Ciro!! What hell is shademap???Â
Shademap is a feature for Stereoscopic images, but we can use it for a trick in 3 steps. Start flaggin “depth of field” in the V-Ray Camera, then:
- Put in the scene the object VRayStereoscopic (create> helpers> vray)
- Set Shademap as “Render shape map” and then run a first render
- Set Shademap as “Use Shape map” and run the final render
That’s just a summary. Let’s go to see the tutorial step-by-step.
.
1) Insert the object create> helpers> VRay> VRayStereoscopic. Set eye-distance = 0.0 and set “mode” = “Render Shade Map”, then assign a file to store the result.
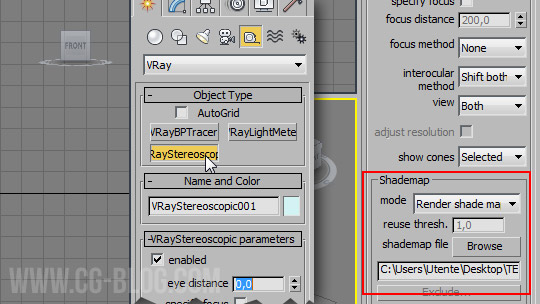
( Actually VRayStereoscopic is used to create stereoscopic images for 3D glasses, but for now it’s the only way to access Shademap. This feature will be opened to the public, but for now we need this trick.)
.
2) Run the first render and got an image without Dof in 7mins. Even if I activated Dof, this first image does not calculate it. Don’t worry about 😉
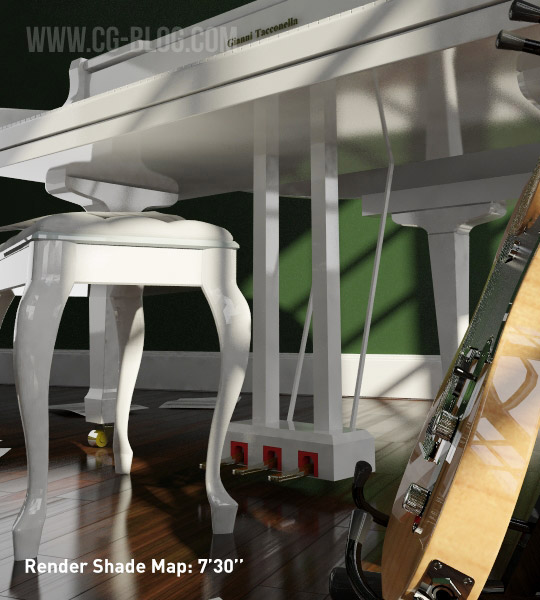
(I don’t need this first image, it’s just a first step to calculate and store the shademap)
.
3) Back in VRayStereoscopic object and change its mode in “Use Shape Map”. In the next render I’ll use the data stored in the previous one!
Hit render and get a render with DOF (approximate) in 2 ’50 “:
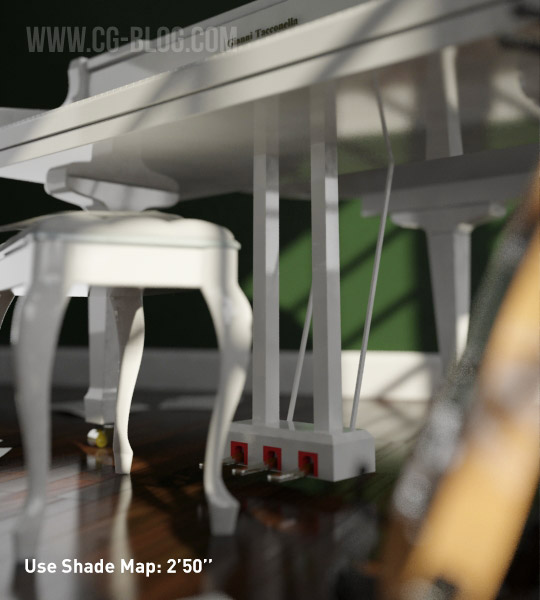
(When you run a stereoscopic render you got 2 different images, slightly different, as the distance deviated eye set. In this case the output is identical so stop the calculation after the 1st image)
HERE THE TOTALS:
- Regular Dof = 18′ 50″
- Approximate Dof =Â 7′ 30 “+Â 2′ 50″Â =Â 10′ 10 “
It’s clear there is a difference between the two results in terms of “pixels’ : A mathematically more precise rendering takes longer than an approximate one, this is pretty obvious.
Your skill is in deciding how to balance mathematical precision and visual perception. In this case the approximation does not affect the perception, so you can use this trick.
WATCH THE VIDEO :
VIDEO SUMMARY:
- Download the start scene;
- Enable dof, add VRay Stereoscopic (eye distance = 0,0);
- Enable “Render Shade map” option;
- click Browse to give a name to the shademap file (.vrst format);
- Hit a pre render… (don’t save it!);
- Change shade map mode in “Use Shade Map”;
- Hit render once again;
- Render just the first half image.
EXERCISE:
Download pack: dof-faster.zip
 / Also Learn Corona Renderer


HELLO I THINK THAT ZDEPH PASS AND FRISH LUFT PLUGIN FOR AFTER EFFECTS IS BETTER SOLUTION, BUT IT IS GOOD TO KNOW.
Hi Azynsky,
not totally agree. In many cases yes… but not when an object overlaps, like in this case. Anyway it’s the beginning of the post:
« First of all I wanto to clear that I prefer to create such effects in postproduction… »
😉
nice tip
thats very usefull!!! thx
Hi Ciro,
Your sum should take in account the setup time for Shademap and not only the render time. But may be Chaosgroup can use this stuff to improve native DOF algorithm this was a great idea!
Congratulations! And thanks for sharing.
Thank you Sergio,
you can read at the end of the post: Approximated Dof = 7′ 30” + 2′ 50″ = 10′ 10”
(2’50” is the dof prepass… or setup time, as you say.)
Hello Ciro
Thank you for sharing.
very nice tutorail
thanks
Mr.Ciro can u please make a tutorial about using white balance, i mean to avoid bleeding, and to have a white ceiling and wall
Thanks in advance
dear ciro
thanks for your all tutorials are excellent
Snce this is a “fake” method of sorts, I would rather just keep outputting a zdepth pass and do this in photoshop or some other plugin like dofpro.
It this who or do it in brute force for real… No point having the midway as is now.
Yes RONEN, I agree with you in same cases.
Anyway you probably missed reading my introduction for this post:
« First of all I wanto to clear that I prefer to create such effects in postproduction.. »
PS Nice to read your comment here 😉
Hi all,
Thanks for this simple tutorial. I’ve been talking with Chaos Group lately about my depth of field/motion blur pipeline, and they did mention shade maps as my solution.
First I should say I very much disagree with Ronen on the “fakeness” of this method. If anything it is a LOT less fake then post DoF, which is THE ultimate fakeness in this field.
Not that I have anything against post effects. But let’s say when I started my career, 20 years ago, we had no choice but to use post effects as machines were so weak 3d blur was out of the question. So I have been using a lot post DoF/MB throughout the years.
But… it never looks quite as good as 3d blur, plus you get loads of artifacts when the image transitions from a close up object to a faraway background. This is true both for DoF and MB. And mixing 2d DoF and 2d MB, though sometimes works visually, is complete bogus in terms of maths and pixels.
Ideally we would be using 3d effects for ultimum quality. Yes yes I know, it’s not flexible and slow, but… it’s the only thing that looks truly good. However it is too expensive… So, there is an alternate solution, which looks great and is relatively cheap. I first implemented it in Mental Ray, and it worked great. The idea is to first render with full on sampling, complex shaders etc… without blur. Then camera map this onto the same geometry, and re render this time with blur effects. Because a camera map is virtually free in terms of processing power, this renders really fast. Of course there are visual inconsistencies, but they are 90% of the time very acceptable. And this method in any case will ALWAYS yield a better result than post 2d DoF and MB.
Honestly, this is very true. I recently made a commercial for a watch with loads of very close up shots and very narrow DoF, with hundreds of parts in front of each other. The result is photoreal. This would be impossible to achieve using motion vectors and a depth pass.
This shade maps technique is basically doing the same thing. Let’s say it’s the best quality/render time ratio. And… you can have both DoF and MB perfectly intertwined! Try doing this in post, again I have many times, but 2d DoF plus MB is just the fakest, most inconsistent approach you will ever get. Post stuff will soon become obsolete…
Vania
Hi Ciro,
I am new for v ray,so, I can’t get effect of dof very well .
I don’t have v-ray in helper, there is only ‘vrml97
I have 2009 v ray version,
Hi Hina,
did you download the PACK and try to reproduce the example?
Hello, I try to follow the steps but when I place the object VraySterostopic, this does not appear the properties it says the video tutorial.
So what next steps I can not make them (I used the scene there to download)
I use 3ds max 2011. Can it be this one right?
Thanks
Hi Carlos,
I’m not sure to understand your question: you don’t find VraySterostopic object? Or what exactly you don’t find? (what V-Ray version do you use?)
yes, find it and put a VraySterostopic object, but when I give their properties to follow since the video tutorial (eg shademap options) do not come out all those options that appear in the video tutorial, but a very small menu.
My version of Vray Vray Adv is 1.50 SP5
(options VraySeterostopic I displayed the object are only:
enabled, eye distance, focus method, view, adjust resolution)
Yes Carlos, this is probably the problem: Shademap is perfect starting from V-Ray 2.0 🙂
Ok, thank you very much. Then I’ll try updating my software.
You were absolutely right ciro, was because of my version of Vray.
Thanks again, and I upgraded and everything went perfectly.
Nice and simple. But, it doesn’t seem to work for me. When I save the file out, nothing is created, which means there is noting to use for the second step. Any pointers?
Hi Bobby, check the point #4:
“click Browse to give a name to the shademap file (.vrst format)”
you probably was missing that… let me know 😉