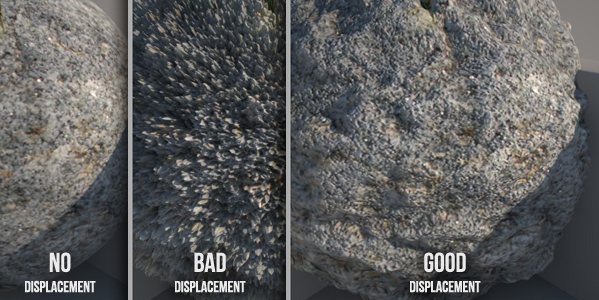
You need to render a rock surface and you just have a diffuse map. ( Look here for Free Textures! )
How to convert it in a good displacement map?
Open the texture in photoshop and work it in order to get your displacement map. But often we just get really dotted surfaces, like “BAD Displacement” above? How to improve it?

In this video I use a combination of Photoshop filters to get a good displaced rock.
Watch the Video , download the Files and complete the Exercise to fix the concept.
[private Premium|Premium1|Premium-1year]
VIDEO :
VIDEO-SUMMARY :
- Create black/white version
- Add curves to enhance contrasts (save as “DISPL1”)
- Use Cutout Filter to simplify the texture
- Use Gaussian Blur to smooth details (save as “DISPL2”)
- Use DISPL2 in V-Ray Displacement modificator
- Use DISPL1 as bump map to give more details
EXERCISE :
Download this PACKÂ and do the same you watched in the video.
Start the exercise opening “Dof – START.maxâ€
( For any doubt check “FINAL†version )
[/private]
*
*
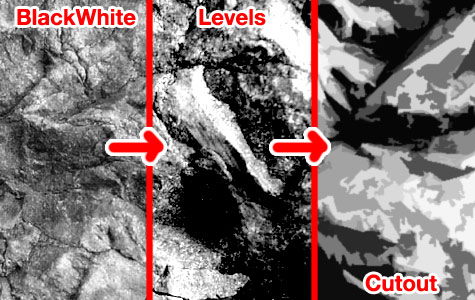
What I show in the video is the Cutout filter:

Cutout reduce the nuances present in the image, thus solving most of the problems!
The classic steps to create a displacement map is:
- Transform it in black and white texture
- Contrast the image
- Save and apply it in the displacement channel
Ok guys, today I want to suggest one step more:
Apply the cutout filter (to reduce the color variations):

Look at the difference in the image below:
If you want to refine the displacement map you can use Gaussian blur filter.
The displacement will be softer.
 / Also Learn Corona Renderer


It is a good idea thank you
really useful!!
thanks
Thanks for this… Looks great!
That is a nice trick! Thanks for sharing.
Hey thanks, this is really a nice cool tip, got great map.
What an amazing article. Thank you for the insight…
This is a great tip! Ive been working on a good way to do this and this hits the sweet spot 🙂
Amazing tip, Ciro!
Thanks for the useful info!
Looks better and renders faster!
Amazing website! thanks so much!
thank you
very nice tutorial….thanx a lot
Really useful
tnx
Thank you!
im new to Ur Blog found Ur write ups are absolutely fantastic and more helpful
Thanks
Never realized such keen issue on displacement map. Thanks for the nice insight this prove to be useful
very nice tut and trick,
really good tip……thank you
Really great tip !
Thanks a lot !