Here we are for the first post about 5-Step Render Workflow® :
our complete method to manage render process in 5 easy steps.
The 1st step is about preparation, a sort of check-in, it consists of easy concepts which often people don’t care about creating a lot of problems impossible to solve later on. Let’s get started.
.
.
5SR-WORKFLOW: Check-in / Step 1
First don’t forget the 3 MAIN rules you’ll never break:
- Never do anything that does not exist in the real world
- Always use 1:1 scale models
- Place the lights as if it was in a real photo studio
The step 1 is the set up of the job: a great final result is always related to a good preparation. Check your models, find good textures, especially find good images to use as references. ( Read the introduction to V-Ray Mini Course )
So let’s move to 2nd step: LIGHT BALANCE. I’ll show you how to manage it easily:

.
.
5SR-WORKFLOW: Light Balance / Step 2
Light Balance is one of the most important steps. If you can’t find a good light balance don’t move away! Work on it until you have a good one: find a good light balance and your final render will be great, that’s for sure.
The process is based on a light Herarchy. it’s really simple, watch the video:
[private Premium|Premium-1year|5trainings]
This scene is really, really simple but that it’s not the point. If you deeply understand how important is this step and what are the crucial concetps, you just need to apply the same concepts on every type of scene. Even more complex scenes becasue the concepts never change.
CONCEPTS:
- Set White balance on Neutral (there are no dominant colors)
- Pattern to start working: Â shutter speed = 50 / Light: around 500watts / Material: gray default
- Work 1 Light at a time
- Â There must be a single shadow in the scene at the end
COMMON MISTAKE:
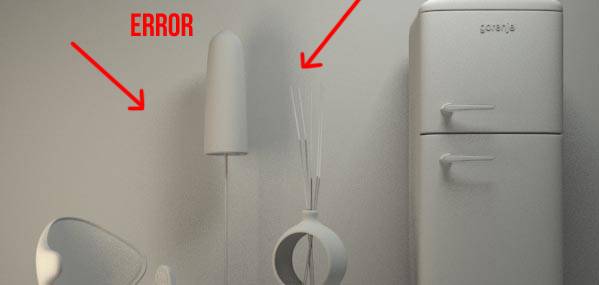
One of the most common errors is the duplicated shadow. This is because there’s no herarchy between the lights. Here an example of uncorrect light balance:

EXERCISE:
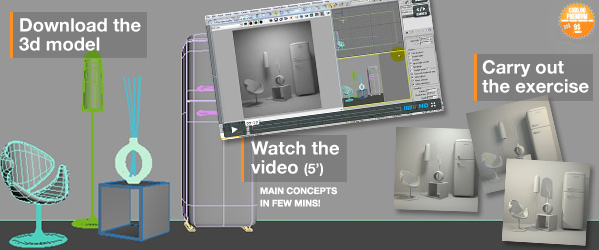
Download the “70S SCENE MODEL“ | “OBJ Version“and create 3 different light balances using two V-Ray Lights. The concept is always the same: balance the First light (stronger) with the Second one.
Three different Light Balances to imitate: Click on them to magnify.
 Â
  Â
 
( Suggestion: First of all try to balances by yourself. To verify download here the solution )
The next week we will talk about step 3: Creating Materials.
Enjoy it.
[/private]
 / Also Learn Corona Renderer


Great !!!… for the first time I feel I’m learning from tutorials
Yes Mario, it’s because it is “educational” 😉
Thank you, I really appreciate your lesson..
Simply, with clear concept and especially FAST!!!!
(I hate wasting my time with tutorials)
SUPER CLEAR! Thank so much, keep it up!!
I love premium.. Thanks.
I’m not a super nerd :-\ I don’t have much time and I can’t read tons of tuts. Your lesson has concise style that I love, I understood all concepts is 5 minutes and complete the exercise in 30 minutes (I’m pretty slow lol)… sorry for my english – Just wanto say thank you sir!
hi Ciro
the tutorials are great, you have really helped me in my progression,
just one thing I cant find a blog or some where to get a few questions answerd
where do I go on your site?
thanks again
julian
Ciao Julian, la triste notizia è che è andato perso. Un grave problema con il server… non mi ci far pensare!
ok meglio, grazie per la risposta, ora la domanda…
dove posso fare domande, (meglio in inglese) del tipo:
quando metto molti luci in una scena perché a il rendering serve,
faccio fatica vedere gli oggetti,ci sarebbe modo di lavorare senza luci ma che sono accesi nel rendering, più tosto di spegnere e accendere ogni volta?
scusa per l’italiano..:)
Sorry , julian non riesco a capise esattamente la domanda. Write in english if possible.
great tutorials! Its like Mario sais:for the first time I feel I’m learning from tutorials!:)
Im glad to be a part of This blog,Thank you Very much.
HI Ciro,
Nice to meet u again.
I watch the video,but 1st I want’t to clear my basic concept.
1.Is it compulsory that – In Interior scene, the room should be closed.
2.Light s are placed in opening space like window,door etc.or placed anywhere.
3. Can we place light nearer to object to highlight it ,in ceiling of room ,
or behind the camera. all these are right method or wrong.
In your video I saw, the room is open, Lights are near to object (not in opening place.-window or door)
so, that’s why I am clarify my doubts. because I follow the method which I wrote upside
Please clear my doubts.
Thanks
Hi Hina,
here some answer:
1. The room is CLOSED. It seems opened because I disabled “Backface cull” in the object properties.
2. You are confusing whole interior with studio light. This is STUDIO LIGHT confuguration
3. You can highlight objects with near or far lights (no restictions)
3b. Putting lights behind the camera is a “prohibited” method.
I hope it is clearer now.
Thank’s a lot! I agree with Mario. Now I’ve started to learn how V-ray is working…
Hi Ciro,
In step 2( light balance) – 1 st time when I open this step I can see the video,but now it doesn’t show video in this tutorial .
Even all other steps there are video ,only step 2 it doesn’t show.
Hi Hina, I updated the code. Please tell me if everything is ok now 🙂
ok. im watching all your tutorial for now.
nice and goof start for me this one.
Hey! Thanks for making this tutorials, it really motivates me to learn more and to try some of the features in 3d max!
Brilliant video
I like your tutorial, simple and clear, i have much tutorial but need long time to learn these, because there still secret that not exposed maybe,
Hi Ciro!! First of all congratulations for such a good job.
I have one question… in the first tutorial “DELICATE ROOM” you worked in centimeters (system units setup). For the “70’S STYLE ROOM” in inches… Can you explain the diferences and how it affects the scene? For example if I follow this last tutorial working in centimeters and put the same values as you in lights and cameras… my scene becomes too overexposed.
Thank U!!
Hi David!
sorry for delay 🙂
As explicited in BASIC RULE#2 it doesn’t matter what unit you use. It’s just important that the scale is 1:1 – I mean that objects have the same sive as in reality: cm, inches it’s the same. If your scene become overexposed it’s another problem for sure. For example be sure you’re rendering from the vraycamera.
Hi Ciro, first of all congratulations these tutorials are great, the explanations are very clear and very, very simple to understand, I’m very happy because I am learning a lot from the videos
Thank You very, very much!!
Dear ciro,
I got the light balncing in this seen perfctly.In my seen i could not place the primary light
out of the shot if iplace it near the objects.I have an iterior kitchen with a hight of 280cm.
if i make the vray plane light invisible the how the final result will be.You have any tricks
Hi Venu,
this is a studio light… usually studios are 5-6 meters hight. If you have a normal room just place lights where the lights really are. Please study LESSON#31.