Let’s start STEP 2 of 5SR-Workflow® : Lighting.
In this lesson we will talk about:
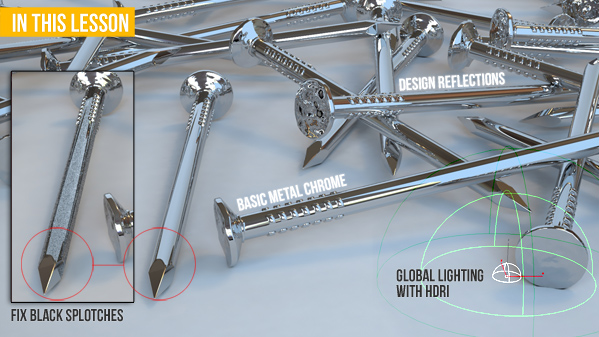
- Creating global lighting with HDRI
- Creating basic metal chrome for Nails
- Using a V-Ray Light to create nice reflections
- Learning how to fix black splotches
If you don’t know these topics below, take a look before to start this lesson:
- V-Ray Lesson #2: Gamma and Presets -premium area!
- V-Ray Lesson #9 – HDRIÂ Â -premium area!
Step 2: Lighting and more
2.1 – BASIC LIGHTING WITH HDRI
This scene does not have complex lighting, but the important thing in this case is to create nice and catching reflections. This is because we have a metallic object. The easiest way to create a good global lighting with nice reflections is an Hdri map…
[private Premium|Premium-1year|5trainings]
The process is also explained in the  V-Ray Lesson #9, and it’s quite simple:
- Add a V-Ray Dome in the scene (wherever you want)
- create VRayHDRI in the “texture” channel
- Drag and drop it in the material editor, then load an .hdr file
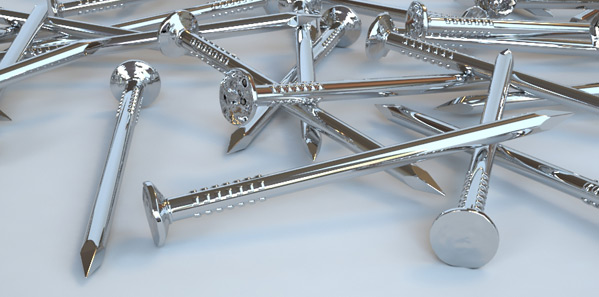
Create a basic Metal chrome for the nails and render with “TEST-preset” – Result:

PARAM.:Â V-Ray Physical Camera = Default values / V-Ray Dome multip. = 40 (units: default)
2.2 – OOPS! BLACK SPLOTCHES
As you can see the nails have strage black splotches on the surface. To check if the problem is related to the material add a new cylinder, and apply the same material:

Metal Chrome on the cylinder appears correct, so the problem is the 3d nail: probably  “overlapped faces“.
There are many reasons for this artefact: imported model, strange manipulations with edit poly… it doesn’t matter, I just want to give you a simple tip on what has saved my life so many times. Here’s how to fix this problem:
Setting:
RENDER SETUP > SECONDARY RAYS BIAS = 0,001  –Look the screenshot / Look before-after
« A small positive offset that will be applied to all secondary rays; this can be used if you have overlapping faces in the scene to avoid the black splotches that may appear.» –  Check here more examples.
NOTE: If you load a preset, remember to set again Secondary Rays Bias! The preset overwrites this value.
2.3 – CREATE HIGHLIGHTS
Let’s create the reflections – Reflections are crucial to communicate the nature of the materials, especially working with glass and metals. The professional way to get nice reflections is not just “put a light and see what happens“, this is for beginners! You should figure out the best place for your reflections, then play with a V-Ray Light to create what’s in your mind. It’s not casual, it’s designed.
To see how to do that watch this video:
Remember: V-Ray light for reflections should be “soft” to avoid affecting the shadows created from the primary light (hdri in this case).
Click here to see the Light balance analysis
The final shadows are the same shadows we have with only Hdri: OK!
2.4 – CONCLUDING
This is the result after this step:
- V-Ray Physical Camera = f8 / Shutter 200 / ISO 100 (Default values!)
- V-Ray Dome = multip. 40 (units: defaults)
- V-Ray light for reflections = multip. 18 watts
In the next lesson I’ll show you how to create a complex V-Ray material to simulate Rusty Nails.
EXERCISE
It’s all about balancing between V-Ray light hdri and V-Ray light for reflections. In this lesson the application is easy, but the concepts are really deep. So, please read it again to understand the idea and try to create the same render above starting from this file:
Download: NAILS STEP2—STARTÂ | OBJ Version (hdri is included)
Tasks:
- Create global lighting with an Hdri
- Fix black splotches
- Create beautiful reflections with another (soft) V-Ray Light
- Work the lights separately
Solution: NAILS STEP2—FINAL
[/private]
 / Also Learn Corona Renderer


You contens are amazing, it’s the first time I find “lessons” on the internet… this is really educative. Gracias.
Beautiful, great lesson, I’m learning sir…. Thank you!
super lesson, thank I enjoyed it.
Nice tutorial and lesson, I like the possibility to carry out your exercises.
Mr Ciro, you saved my life teacher!
Just 1 question, where can I find an hdri for the exercise? thank you.
Hi Ivan,
don’t worry for the exercise because when you download the “START” version you’ll find a nice HDRI inside. Have a fun 😉
NAILS STEP2—FINAL links eror
Thank you for your report!
FIXED!! 🙂
Hey! and thanks for another great tutorial!:)
I just have a problem with sRGB, its a button at the bottom of the renderview, when its not turned on it looks good, and turn on..not so good, but when I save the file as TIFF it always turns out as if the sRGB butten is turned on? What to do? hope you understand my bad explenation;)
Hi Roger,
did you followed this lesson: https://www.cg-blog.com/index.php/v-ray-for-beginners/lesson-2 ? Don’t forget to use V-Ray Frame buffer, don’t forget 2,2 in color mapping / gamma… don’t use sRGB button. This lesson is FUNDAMENTALS to work with my workflow. Let me know if something is not clear! 😉
I figured it out! Now it works perfect, thanks!:-)
U gave a Question about hte Glossiness, if I Render the final file of the Nails i have at the glssoiness artefacts like bad antialaising. Here check the link pls http://www10.pic-upload.de/18.04.12/3ljpixp9j955.jpg
How can i fix that?
Hi Stefan, this artifact is not for glossy: is related to the overexposure/antialiasing. If you reduce the exposure in V-Ray Frame Buffer (you can do this after render) you’ll see the artifact disappearing. In this case don’t care for this because in the next lesson we’ll apply maps to reflect. (I’ll talk in future about this)
Thank you so much Ciro
when i click
Click here to see the Light balance analysis
it says
This image could not be loaded
what is wrong?
Hi Naser,
is this link you talk about: https://www.cg-blog.com/wp-content/uploads/2012/04/ligh-bal-anal.jpg?
At my side I can see this image with no problems.