Every real device to take pictures adds gamma.
We actually are “producers” of images and we need to correctly setup the gamma in 3ds Max, in order to imitate the behavior of real cameras.
In 3ds Max the options we have to add gamma are various:
- Gamma in “output” / preferences
- Gamma / color mapping
- Don’t Affect colors / color mapping
- sRGB button /V-Ray Frame Buffer (VFB)
Every option in this list affects gamma.
As you can understand we can’t use all at the same time!
We have to choose a combination to just adds 2,2.. once!
I’m going to show you how many combinations are possible and you’ll see just one way is the correct one.
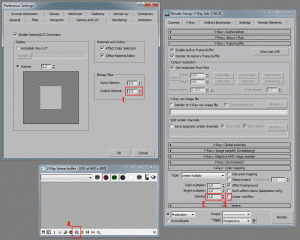
COMBINATION 1 : Gamma in.. OUTPUT – follow the green arrow
– Gamma in “output” / preferences = 2,2
– Gamma in color mapping = 1,0
– Gamma in VFB (sRGB button) = disabled
Brief Explaination:
You’re adding 2,2 to the final image. But in this ways will you’ll get artifacts in the shadows.
The reason is that you’re just adding a “fake” gamma – not good
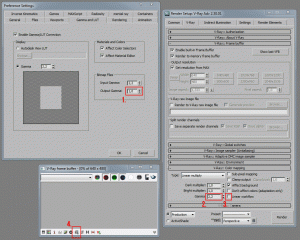
COMBINATIONÂ 2: Gamma in… sRGB button (follow the green arrow)
– Gamma in “output” / preferences = 1,0
– Gamma in color mapping = 1,0
– Gamma in VFB (sRGB button) = enabled
Brief Explaination:
You’re adding 2,2 with the sRGB button but it’s  just a “preview” of gamma. When you save the image the gamma is not added, so you’ll see a different image out of 3ds Max! – wrong usage!
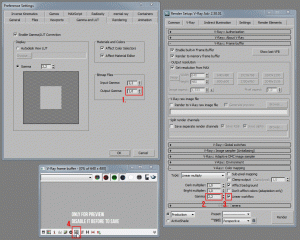
COMBINATION 3: Gamma in.. Color Mapping (perfect) – follow the green arrow
– Gamma in “output” / preferences = 1,0
– Gamma in color mapping = 2,2
– Gamma in VFB (sRGB button) = disabled
Brief Explaination:
You’re adding gamma 2,2 during the computation: that’s fine! Simple and effective.
COMBINATIONÂ 4: Gamma…Â included but not visible (for compositing) – follow the green arrow
– Gamma in “output” / preferences = 1,0
– Gamma in color mapping = 2,2 / don’t affect colors = enabled
– Gamma in VFB (sRGB button) = enabled (for preview)
Brief Explaination:
You’re adding gamma 2,2 during the computation
“Don’t affect colors” hide gamma but avoid artifacts
Use sRGB button just to have a preview
This way is perfect if you want to save in EXR or you want to add gamma in compositing with more layers. In these case sRGB button is really useful to preview how the image will looks after added gamma in compositing.
CONCLUDING
Resuming all combinations:
- Way1 produces artfacts
- Way2 is just a wrong usage of sGRB button! :-\
Ways 3 and 4 are correct but it depends on your operating mode:
- Way3 is simple and ieffective to add gamma during the render (my favourite)
- Way4 is for adding gamma in a different moment from the rendering (compositing)
I showed you also Way1 and 2 to let you avoid these ways!
*
*
Note 1: If your image is correct in 3ds max but really brighten in photoshop the causes are 2:
1) check output value in preferences: it must be 1,0
2) you just used Way2
Note 2: Of course if you use gamma in color mapping + gamma in output + sRGB button… you’re completely wrong. Gamma added will be 2,2 + 2,2 + 2,2… and your image will results completely washed out! Every image need just 2,2 once.
Note 3:Â Always use V-Ray Frame Buffer
.
* Only for premium subscribers *
Check Lesson #2! Preparing 3ds max and V-Ray to start : video and notes about gamma setup.
.
.
Become PREMIUM: training every month
* 3d models and V-Ray settings included *
 / Also Learn Corona Renderer


guidance material you enter when using gamma 2.2
oh thanks, was looking for same tutorial these days, will definitely try all the four combinations to check which suits me best. is there any tutorial for product studio lighting setup?
re…..ally helpfull,
thanks..a lot 😉
Hi Ciro,
Superb tutorials!!
in this one , Option 3 is the way to go for me . Additionally i tick the ” dont affect colors (adaptation only)” checkbox in color mapping rollout + enable the SRGB button. Am i doing it wrong here ?
Another question is , what is the best and convenient format to save the image file?
Thanks in advance!
Hi Schumann!
Your description is quite the Option4. It’s good. You just enable sRGB becasue you want to add gamma during the saving. That’s good.
hi ciro i am watching ur tutorials from last few mounts, i was very impressed with ur way of examples, my main problem is how to do animations with heavy max file. when i am rendering file is getting close…..can u help in solving this problem….
thanks!
Hi i think you must explain the setup when you use output for jpg and for exr.
I work always with exr. My setup:
– Material and colors checkbox / enabled affect Material and color
– Gamma in “input†/ preferences = 2,2
– Gamma in “output†/ preferences = 1,0
– Gamma in color mapping = 1,0 / linearworkflow = disabled
– Gamma in VFB (sRGB button) = enabled (for preview)
The final exr file i open in PS looks correct.
Now you have a 32bit image and a lot of space to make exposure adjustments.
(this setup dont work for jpg output)
Hi IVAN,
your settings is good but not perfect, and this is not just my opinions:
everything is confirmed by Chaosgroup Customer Care.
In particular:
– Gamma in color mapping = 1,0 / linearworkflow = disabled (not perfect)
– Gamma in color mapping = 2,2 / linearworkflow = enabled (perfect)
This is the COMBINATION #4
As specified in the post: “This way is perfect if you want to save in EXR”.
Hi Ciro,
Thank you a lot for your accurate tutorial.
I have some questions about color mapping; the linearworflow bouton, I read on some tutorials that It was “useless” and used for old scenes without gamma correction to force it.
Here are some exemples from some tutorials I found on the web :
– “Under Color Mapping; Linear workflow must be checked OFF as it is a function that can be used on old max scenes that is currently not set up with LWF. (It adjusts the textures and the whole scene for you on the fly. You will not have that double up.)” http://www.homme3d.com/2011/01/linear-work-flow-lwf-med-vray-3d-studio-max/
– “Notice that I haven’t checked the Linear workingspace box. This is an old method, don’t mind this.” http://www.seazo.no/linear-workflow
– “The magic linear woorkflow bouton is a little misleading. It looks like if you tick it, then you will magically get proper linear workflow…but no, you don’t. This button is basically a quick and brutal way of correcting the Vray materials that were not set up and tuned with Linear workflow in mind. I wouldn’t use this.” http://www.davidfleet.com/tutorials/linear-workflow
– “… when this option is checked V-Ray will automatically apply the inverse of the Gamma correction that you have set in the Gamma field to all VRayMtl materials in your scene. Note that this option is intended to be used only for quickly converting old scenes which are not set up with proper linear workflow in mind. This option is not a replacement for proper linear workflow.” http://www.spot3d.com/vray/help/200R1/render_params_colormapping.htm
So now I’m a bit confuse, that’s why I’m posting to get some help. How can I have a proper Linear Workflow (LWF) with a 32 bits image (e.g Exr format) ? Because in my opinion I didn’t find a better way to do it than the Ivan Schuler’s way, I use this method as well because according to me 32 bits image automatically manage 2.2 gamma correction (that’s why we don’t need to put 2.2 but 1.0 into the Gamma in color mapping).
An other question, what about the “Don’t affect colours (adaption only)” bouton, doesn’t it give a proper LWF ?
And the last question, can I have a proper LWF if I use the Type on Reinhard in color mapping instead of using the Type on Linear multiply ?
Thank you in advance. 🙂
Hi Jerome,
all info in the web create HUGE confusion in everyone! That’s the biggest problem.
I can’t check if in every link info are correct. Understand me 🙂
I just want to help you and if you want a SECURE way for gamma correction go to Lesson 2 – THAT’S ALL.
(Color mapping is related to exposure: it’s another theme > start learning it here
hi
thanks for your tips, but colors are bleaching out, how do i get correct color.
Colors you mean textures?
textures are not in right colors with gamma, how to correct?
overall image look over exposed
INPUT in preferences must be 2,2 as you can see in every screenshot. Is this your setup?
Aren’t you mixing, on combination 4, the “Linear workflow” checkbox’s effect with the “Dont affect colors” one? Cause the Dont affect colors do just this, take into account 2.2 for calculation and 1.0 for image color…
Btw is always said that Linear workflow checkbox is only for correcting really old scenes
Hi Pep,
I don’t know who said..
I checked the official guide Chaos and V-Ray assistance.
Thanks for these tips…. Good Luck !
Hello Sir I Have One Problem
1);- When I Create Scene With Gamma 2.2 And merge Evermotion model so that is no look good So What is Problem ?
2):- Evermotion Model’ material is compatible with Gamma 2.2 ?
Hi, gamma is indipendent from the models… so yes, no problem using evermotion 3d models.
Hi Ciro … Its a really good job you are doing with these tips .. Helped me a lot .
With this Gamma settings .. My MAX image looks fine but when i import it to PS in TIFF 16Bit format i get a darker image ..
As per the tutorial i’ve changed ‘output’ value to 1.00 and am using ‘Reinhard’ with 1.8 Gamma … am not using VFB ok ?
I’ve used combination 3 … can u help ? 🙁
Hi Muhammed,
this is just to add GAMMA: to correct apply this to get linear workflow require more informations. Check LESSON 2 😉
Hi Ciro,
the first tutorial for LWF which does not confuse me.Thank you!
Is it true, that if using way 3 (uncheck “Don’t affect colors”) but saving as EXR, I won’t be able to get the same result as if have checked it, not even by applying gamma correction in Photoshop?
Thanks,
Gerrit
Hi Gerrit, if you want to save with EXR I suggest just to follow Way4. Thank you for your comment!
so usefull….Thanks Ciro…..
Hi Ciro,
I bought you book and I’m still a little confused about how to save my render elements to make my conpositing in photoshop.
If I work in linear multiply it works fine, but if my vray settings are :
-color mapping : reinhard
-bright multiplier : 0.2
-gamma : 2.2
– Sub pixel, clamped output, affect background : checked
I never have a compositing equal to my beauty pass.
So how to save my render elements for compositing in photoshop from the VFB when i work with Reinhard color mapping ?
Thanks !
Hi Abrah,
basically if you compose with render elements – as specified in this post – you should apply the combination4 to get the same (or almost same) result of your beautypass. Enable “don’t affect colors” and add gamma 2,2 in photoshop at top of your layers. Hope this helps 🙂
Hello Ciro and thank you for this usefull tut!!
I have a question though. I’ve seen a lot of people overriding the gamma to 1.0 while loading an image such as displacement/spec/normal map. Is gamma overriding those maps a good way to use them with vray? I think your article would be 100% complete with that answer!
congratz again, from france! 🙂
Salut Alfred! 🙂
If you override 1.0 bump/displacement maps you’re simply converting that maps in a more contrasted maps and… yes, this could be useful. BUT as trainer I have to say you: If you know what you want, you do actions to get what you want! If you override 1.0 and you don’t know what is happening sometimes will be fine, sometimes not.. and you’ll never understand why (this is what usually happens). That’s just my opionion, hope can be useful to you 🙂
So the proper way in Max 2014 is :
Gamma and LUT: all enabled
I dont have an option for importing bitmaps anymore so i can tell that it imports at 2.2 right?
Color mapping:
gamma 2,2 / Mode: None (dpn’t apply anything)
So now with SRGB button on shows the correct image (gamma 2.2). Also like this in max rendered frame window u see the correct result!
On export (with ur provided script) u get a 1.0 gamma so u can add in post.
Are these infos correct? Thank u!
I This those ways are much better now -> http://www.learnvray.com/demo/gamma-extra/
on my frame buffer image is perfect, but when it comes to saved tiff, or whatever, the image has reddish tone…
reddish or… washed out? Images becoming reddish is the first time for me :-\
very useful information keep rocking