In these lesson I’ll talk about V-Ray Materials.

INDEX
- V-Ray IES and V-Ray Light Materials
- How V-Ray Light Materials works
- Compesate exposure
- Direct Light
- Simulate water pool
- Increase reflections with IOR
- Lights underwater
- Affect Shadows option
- Create a reflection map form the diffuse
- How reflection maps work
- 3 narrated HD VIDEOS are included
- Start and Final MAX FILES are included (exercise)
Time to complete this lesson: 25 mins
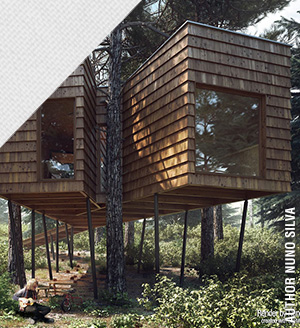
These are the areas and the materials we will work on:

[private Premium|Premium-1year|bluevilla|5trainings]
V-Ray Light Material
How V-Ray Light Material works and how to use it in combination with V-Ray IES:
*I really apologize for my english.. I do that only for you!
I know that narrated videos are helpful.
CONCEPTS:
- V-Ray Light Material is useful to simulate light sources (bulbs for example)
- Fit the “light” look in one click, with “compensate exposure”
- Produce sharp shadows enabling “direct” (subdivs = controls grainess)
- Use V-RayLightMtl to simulate the “V-Ray IES source light”
Water Pool Material
How to create water pool material and underwater lighting.
Many people think that waterpool and underwater lights are some special shader or mega-trick. Instead is the easiest shader you can create.
CONCEPTS:
- Use a simple plane to create the water surface
- Water Pool material is like a glass
- Just put lights under water-surface and they will work easily!
- Remember do not use “affect shadows”
Note about Affect Shadows:
“Affect shadows” option is useful to let the “direct light” pass through the surface in case caustics are disabled (by default they are). Affect shadows is required for glass:Â otherwise we can’t see any sun in the interiors! But in the night-pool is better keep separated the lights over and underwater. For this I didn’t used affect shadows.
Wood + reflection Map
How to create a reflection map for wood, starting from its diffuse map.
CONCEPTS:
- Basically reflections are uniform/flat reflections
- Reflection map is perfect, especially for wood
- Create b/w + contrasted version of diffuse channel
 Â Exercise
 Exercise
To start the exercise download the file VILLA-MAT.ZIP: you’ll find 3 cameras and many freezed objects.
This is to let you focused on specific materials and reapeat the entire lesson in few minutes:
- File to start the exercise: villa-mat.zip
- Exercise complete: villa-mat-ok.zip
Otherwise you can follow to work on your ‘regular’ balanced Villa:
[/private]
 / Also Learn Corona Renderer
great Lesson thank you!
I really suprised how easy it could be in your tutorials!!!!!
GREEEATT
hey thank you for this brilliant piece! your english is fine and understandble.. don’t worry and keep up your great work
Really effective lesson… I was also looking for a simple simulation of poolwater! thanku
hi,
nice tuts again. but be careful to decease reflection effect while using bitmap, your reflection color has to be darker than most bright spot in your image. then you can reduce numeric value in maps section.
Best wishes
Looking great ……… good luck !
Really good lesson. Easy and practical. And your English is just fine, the narration is good !!
i was really waiting for it
thank you again
Hello Ciro! Wonderfull tutorial as always!
I am a little confused about the fresnel reflection. In which cases I should not use it?
Hi Viktoria,
fresnel is just for non-metalic objects.
Look a kthis lesson: https://www.cg-blog.com/index.php/v-ray-for-beginners/lesson-8
Unluck “L” if you want to enhance it.. my suggestion is never abuse 😉
Thanks Ciro! Sometimes I get confused with it!
I have another question though.
I saw when you were working in Photoshop you saved the material in jpg format. What is the difference if we are working with png format? Is it better with png or with jpg because they are smaller in size?
If you save JPG 100% quality they are pretty the same.
what did i miss? i cannot locate bitmaps of final file materials
Hi Gil, thank you for your message!
The packs are updated with textures 😉
ciro sei grande e il tuo sito è magnifico
mille grazie
hello
what is the best graphics card to handle thousands of polygon?
QUADRO for sure! Higher price = more polygons to handle 🙂
Hi,ciro
I’d like to ask u why in my vraylightmaterial parameters doesn’t has “compensate exposure” option? There is only ” emit light on back side” option……I’m using V-Ray Adv 1.50.SP5 and 3DS max 2011…..tq
Yes Benny, this option appeared in vray 2.0 – Anyway you can just increase multiplier, it is absolutely the same.
i like this tutorial very much…nice tips thank you.
very nice tutorial! 🙂 Ciro can you kindly show how to put the camera placing specailly in the interior with small amount of space? how can you show the large area without that much distortion on the scene? thanks in advance!
Hi Paul, thank you for your words 🙂 You can select vray camera and click GUESS VERT to correct lens distortions 🙂
thanks Ciro! 🙂
hi Ciro
where I can find vray presets that I may be more practical to move from one set of final render one test?
Hi Christian,
check the settings for TESTS and FINALS in LESSON 2 😉
Hi Ciro,
very nice tutorial.
I assign light material on object but when render it looks gray . (also tried different colors & increase intensity ,however it looks gray.
& earlier I told about —- I can’t render in v ray 2 .when I start render immediately one click & then nothing is render.
I have free version of 3ds max 2011 & demo version of v ray 2 of choas group.
plz tell me what i have to do? because I can’t practice any exercise.
Hi Hina,
about which file are you talking about? Probably you have a flag to “override material” (render panel(F10) > V-Ray > global switches). Let me know 🙂