In this video I’ll show you 10 important points about daily exterior:
How to create a nice composition and control the light balance.

Contents for this lesson:
- 1 HD VIDEO LESSON (15′ narrated by a certified V-Ray Trainer)
- Photography composition rules
- V-Ray Sun/sky and V-Ray Physical Camera
- Modify sky colors and correct distortions
- Use V-Ray Real Time
- Light balance analisys
- Light Balance application
- White balance for sunset
- Download the 3d model to carry out the exercise (80mb)
- Download the completed exercise to check it (82mb)
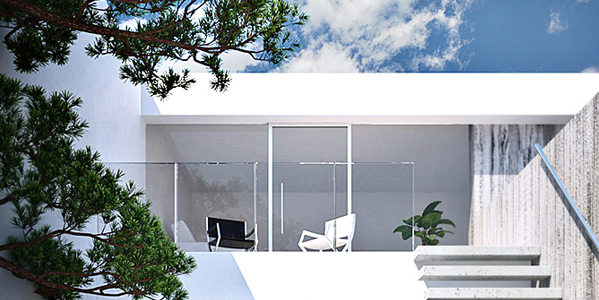
After this training every student will be able to get this amazing render:
*Model was built from zero, but thank you Sebastian Tupper for inspiring me this great training.
Create the Shot and Light Balance
Enjoy this video and carry out the exercise.
Remember this is not a tutorial: this is a ‘Lesson’ with principles + applications.
[private Premium|Premium-1year|5trainings]
RESUME FROM THE VIDEO LESSON
THE 10 POINTS:
1 – Positioning Camera:
To control perfectyl your camera I always suggest to place it from the top view. I know this is a ‘stupid’ suggestion but in my live training I see maaany people placing cameras from everywhere. That’s no problem but the best way is absolutely placing camera from the TOP.
2 – Camera Height
Adjust the height in the LEFT/RIGHT view and remember that head height is a great point to place your camera. I usually prefer 30-40cm in less than head heigh. I tested in many situations 130-140cm from the ground is great!
3 – Distortion Correction
The sky  is a really important element in the exterior compositions. Select the target and move it up to include more sky in your shot. By doing this the distortions wuill be more and more evident, espcially for short focal lenght. Use GUESS VERT to correct distortions. This is fundamental in architectula photography.
4 – Central Perspective
I usually define this solution as the “atomic bomb” of the composition. I one of the most common technique to take shots but is the best one. It works fine in many, many situations. Central perspective  always give a strong impact of your picture. Line of flight must be in center, simmetry is perfect.
5 – V-Ray Sun and coordinates
Add V-Ray Sun and accept V-Ray Sky. You can also use SYSTEM > SUNLIGHT if you want to get the correct sun position in the sky. Place “sunlight”, choose the country, hour, month etc.. then got to modify and select V-Ray Sun. You’ll find the same conrtols of the ordinray V-Ray Sun.
6 – V-Ray RT
Active V-Ray Real Time to check the light balance in real time.
7 – Playing with Sun
Can you modify the sun in the real world? Â So never modify “multiplier”, never! Instead we can play with SIZE MULTIPLIER to create soft shadows and TURBIDITY to change the sky colors.
8 – Balance Sunset
If you like long shadows in your scene you can place the sun as in the sunset. Too much red in the scene? Balance the colors setting white balance 3000-4000°K in the V-Ray Physical Camera.
9 – Light Balance analisys
No way: sun light  is flat. There’s no nuances like in the interiors. Creating a sort of nounces it’s up to us! Do you have large areas with a flat sun light? Add trees and project shadows in the scene. Remember, Sun light IS flat! It’s up to us create somthing to “break” this flatness. Using trees is one of the most common trick to do that.
 10 – Objects in first plane
This is another important photography composition trick. It’s called  entry point and it must be evident! Place something in first plane to help the watcher to entry in the picture. This will give depht to your picture. This will also give you the chance to create nice DOF effects.
 Â EXERCISE
 EXERCISE
Download the Minimal-Exterior -Â STARTÂ and follow the 10 steps in order to create a great shot and a nice lighting using V-Ray Real Time. Please, don’t be a robot!!! This is not a tutorial, this is a lesson becasue I’m giving you the principles. Please, reflect on the points and think with your mind while using 3ds max and V-Ray.
Download and check all the options in “Minimal-Exterior- Lighting Complete” max file.
[/private]
 / Also Learn Corona Renderer


Simple and Nice again 🙂
thanks for Tutorial
Hi Ciro,
Nice tutorial! I learned a lot from this video. Simple and very informative. Will you also release any tutorials on creating and rendering walkthroughs or animations?
Hi Angelo, thank you for your words.
I work a lot for making short videos with relevant information: it supposed we don’t have enought time but also need to improve.
I’m planning someting about animation even if 5SRW certification is strictly related ot “photograpy + vray”.
Hi master Ciro!
Talking about the position of the camera, i have a question!
When i have a tall building…. put my camera between 30 cm – 140 cm ? or not ?
Hi Sandro,
of course it’s up to you, it’s on your taste.
I like 130-140cm because this allow you to clearly see the “lines” from the first floor. This has a really strong impact to the composition! Of course every picture has a different story to tell… generally this is a good rule.
thanks for Lesson
Hi Ciro With tour videos is very easy to understand Vray and ejercise is so practive and concrete very useful and congratulation for your hard Work
Another Question master,
What is the proportion of save and load calculations maps ? I wanna do a 1920 x 1080 image as usual i made my maps always half of the final image… okay… that’s right or can i do 1/3, or 1/4?
Hi Sandro,
what do you exactly mean with “calculation maps”? Maps for texture, for GI or something else?
For Gi Irradiance and light cache !
If I understand fine you first create maps IRRMAP+LIGHCACH and after run the final render. Right?
Why do you follow this workflow?
Because somebody told me that is more fast !
You can do the same choosing “medium” irradiance map instead of “high”.
About light cache… it’s so fast, what’s the matter?
Your workflow makes sense for animations, not for static images.
Thanks!
Are there trees in 3ds?
thank u so much ciro,really interesting…:)
Very nice lesson Ciro. Good tips about first plane entry and to avoid a flat rendering.
Hi Ciro,
As ever, a very imformative tutorial. My understanding has increased ten fold since following you.
Many Thanks
Hi cifu Ciro,
Today is my first time of premium. Fantastic and very easy to learn the right way of Vray. Hopefully you can prepare another training/ tutorial for High rise building exterior either daylight and night view soon.
Great thanks!
All i understood is:
One point perspective is always better. The camera should be placed at Eye level. Place something at the “Picture plane” to give easily the “Depth” of the view.
are those all correct Sir Ciro? 🙂
that’s right Linkon! of course there are a lot of combinations and possibilities to get “deep” into your images, by the way all you’re saying it’s perfect 🙂
These lessons teach me alot. I am glad i signed up for this. Thank you Ciro.