In this lesson I’ll talk about Light Balance.

LESSON#28 -Â INDEX
- Analisys of the light contributes
- Analysis of the shot and the composition rules
- Lines/distortions/3rd rule
- Use V-Ray Light as Portal
- Outdoor and indoor application
- With and without “simple” option
- Curtain material
- Overexposure control
- Exponential Color mapping
- HSV Exponential Color mapping
- “200-50-10” sequence for exposure
The most important thing to do in any scene is understand the situation and choose the best way to approach.
The scene we’re going to study in this training in an interior with a lot of diffuse light because of a curtains. The sun light the interior through the curtains and th result we will reach is this render below:
![]()
What I mean with “correct approach”? I mean at first considering these 3 aspects..
[private Premium|Premium-1year|theliving]
1) V-Ray Light “Portal” mode:
This option “push” inside “the exterior light and especially produce diffuse shadows, which is impossible with only V-Ray Sky
2)Â Color mapping Exponential:
Because of the big difference (= too high contrast) from exterior and interior we have to use Exponential Color Mapping, so we can avoid strong overexposures on the curtains
3)Â Shutter speed 1/50:
The quantity of light in the daily-interior is usually classifed as “average”, so we can start increasing the time of exposure by setting Shutter Speed 1/50Â (default value is 1/200 which is perfect for daily-exteriors)
Shot and Light Balance (steps 1-2)
In this video I explain you some aspect of this shot (composition=step1), and I complete the Light Balnce(step2) by usgin V-Ray Light Portals:
CONCEPTS:
- The Rule of Thirds / composition
- In this kind of scene we just have diffuse lights = no hiearchy;
- Natural and diffuse light in interior can be easily simulated with a V-Ray Light Portal;
- Correct position for the “portal” is 30-40 cm outdoor;
- SIMPLE option is useful to bypass any object between the portal and the exterior;
- With SIMPLE option we can put a portal light in the interior, close to the curtains;
- Portal Light with “Simple” produce less noise than without simple;
- We can use HSV Exponential to avoid overexposures, preserving the sky nuances.
 Nota: to have a general idea about the quantity of light in different situations we can keep in mind this:
Daily Exterior > good light > shutter speed = 200 (valore default)
Daily Intyerior >average ligth > shutter speed = 50
Night Int/Ext > low light >shutter speed = 10
This sequence 200-50-10 is approximate, but allows us to be immediately on the right way because these values are fairly coherent with the real world. Of course, the succession 200-50-10 is valid for  f = 8 (default) and ISO = 100 (default).
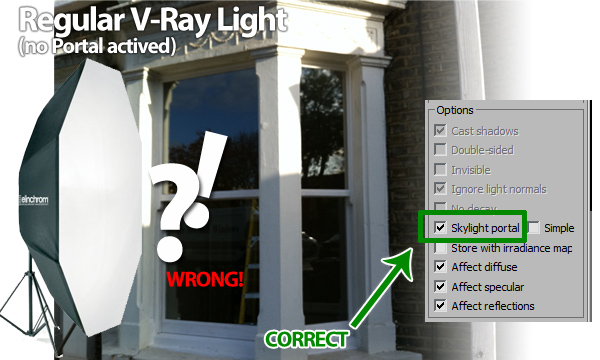
Always use “Skylight Portal” at the apertures!
The “regular” V-Ray Light is the equivalent of a physical BANK LIGHT (click to see it)
The “portal” V-Ray Light is a sort of symbol. He tells to V-Ray to bring inside light and especially shadows produced by the sky.
If you put a regular V-Ray Light out of the aperture you’re just putting a Bank Light out of your window! Can you figure out this situation in the reality?

Be careful, becasue if you DON’T active “portal” you’ll get a fake lighting.
At your apertures always use Skylight Portal!
 Â Exercise
 Exercise
In the FILE1 I just placed the camera (with default values) and also created the curtain material.
Just apply all the concepst  explained in the video starting from the “naked” 3d model, and create a correct light balance. This is the image you should achive:
- FILE1: naked 3d model | OBJ Version
- FILE2: light balance / Complete (check it to verify your work)
[/private]
 / Also Learn Corona Renderer


Awesome work – cant wait for the rest of it.
TQ Ciro ! Been waiting for this a long time 🙂
Superb lesson Ciro, voice spot on, thanks so much.
oh the Voice is so handsome
good
hey Ciro – if there is noise in darker regions of the image (ie where there is not enough natural light getting to it), how would you fix this? adding an artifical light or vray render setting?
Hi Sirmontal,
this scene is not the case becasue we are full of light here! 🙂 For this case please check the light balance in “Delicate Room”. You’ll see how to fill the shadows to get a lighting for catalougues! > https://www.cg-blog.com/index.php/2012/04/24/delicate-room-light-balance.htm
voice so low almost unbearable makes it hard to understand and focus on what is said, sorry. your heavy Italian accent was much better.
Oh no, what is this voice ? Really too speed for me.
Ciro, come back !!! Forza !!!
In my view Ciro understands what you want to explain because if it costs me quite new and do not understand much of what he says
Back Ciro
hi sir ciro.
thanks again for the tutorial,.again you give us enourmos and wonderful knowledge about
visualization bravo your such a great teacher.
one thing about your dubber. is so masculine. and very fast talking.can you slow little bit,
and talk like normal. what if you change it, a lady voice.
tasismoh
HI GUYS!
I ADDED ANOTHER VIDEO WITH MY VOICE.. PLEASE CHECK IT!!!!
thank u very much. your voice its much better, the other was to strong, some things are hard to understand.
Hi Ciro,
Really nice explanation, still prefer your voice.
Keep up the great work.
Paul
Hi, frankly i prefer your voice, because you speak slower and i can understand everything you say. I am from Mexico, i’m not a native english speaker and i am more used to the american english accent, and the dubber has a very remarcable british accent that makes it harder to understand. I also prefer to hear a real person speaking. In my opinion, i stay with your voice.
impresionante ciro a practicar de una buena vez la iluminacion
gracias !!
thank you Ciro for that new video with your vioceover. now i understood it all.
Hi Ciro…your voice is more familiar, more friendly for me, i have feel that you are talking and explaining it directly to me 🙂 And it is more easier to understand your english and your kind of explanation than the new guy. It is my opinion.
thanks for the new work Ciro…like your voice better.
Cheers
hi ciro
i think you should personaly talk while your driving the scene.there is a control while pointing your mouse to the monitor.
yes your voice is more clear friendly, a pause while pointing to the screen.
personally i prefer your personal voice than to look for a dubber, no need to hire.
cheers
Hy Ciro, thanks as usual for the useful lesson.
But, if I wanted to use this scene as a template for another project with openings to the outside lower.
How can I increase the brightness of the scene using vray light plane?
It ‘s normal that the value of multplier exceed 100 or more?
I’d better use some IES lights?
Thx again and Bless ….
Hi Dario,
PLEASE FORGET VRAYLIGHT for a moment: and think in terms of photography!!!! VRay Light is the object to simulate the BANK LIGHT(click here!), and in your mind you’re start thinking to handle a BANK LIGHT in a set, and using it as photographers use bank lighs in the real sets:) this is soooo important!!!
If you add a Bank Light in a scene JUST to have more brigtness you’re adding shadows, modifying the light in the scene! That’s no the correct way: If you need to increase the GLOBAL BRIGHTESS just use the curves, in vrayFrameBuffer or in Photoshop: Nothing easier! Otherwise if you have dark angles you can use a Bank Light (vraylight/plane) or IES it depends on what do you want to achieve. See here a good example with IES 😉
Hope this helps 🙂
Hi Ciro, I prefer your voice is better understood and more clearly your English.
Your narrative is frankly better
Ciro,I see most of perspektive viewport (with vray physical camera) have the guide lines…why we have to use it and how to show it in my perspektive viewport…? Tq
Hi Benny, what guide lines are you talking about, the “SAFE FRAME”? Can you send me a like or a simple screenshot? 🙂
it’s clear! that your voice was much better and understandable..i think no need a dubber.
Hi Ciro, as allways this is a great lesson, I’d rather to say lesson instead of tutorial, but when you started to doing this, there was no voice at all and we all understand everything and we qualified it as a good learning lessons, when you start to put your voice, it was an improve that we all appreciated very much, in my modest opinion you are the only one that is able to comunicate your learnings in your own english.
Me personally put more attention to yours clicks than your words, but at the same time your words are importants because you explain in real time what you click.
Even if you make a mistake we all see when you corrected it and you explain it.
Sorry for my long comment but my sugest is to keep on your own voice
Great lesson Ciro.
As for your question, I prefer the video with your voice in it. The first one is fine as well but your voice is much more lively.
I also prefer your voice…. Please take our feedback into serious consideration when deciding on whether to use a voice actor or do it yourself.
Thanx.
Anywhere your voice is much better and really understand for me.nice works.
my question is under the light parameter should i increase the light default sampling value 8 / as i known by increasing the value it will effect render time is it? any pro n con
Thanx
Hi Hamdan,
of course we need to increase the sampling but NOT at this step2(light balance), but just at step4(cleaning image), after material creation. Anyway, before to increase the specific sampling, you need to reduce noise threshold from 0,01 to 0,005, as shown in every training. After this setting you’ll increase a specific subdivs in vraylights JUST if some vray light produce particular grainess. Hope this helps.
Mr. Ciro,
i like your voice much better! easier to understand. don’t need a dubber voice,
this is not an advertisment which need a macho voice over, your explaination is
perfectly clear. Cheerio!!
Hi Ciro, I prefer your voice!! great material as usual!!
i’m very excited to start with learn v-ray with you. I hope in 1 year i became a v-ray monster.
ahahahahaha.
hi Ciro,
again its very useful tutorial. Thanks. & prefer your voice.
I have some questions
why we place v ray light 30/40cm.far from window (can’t we place near to window ? what is the different ).
Is it necessary that In all interior scene, we have to place v ray lights in every opening or this is optional.
where we use v ray plane light & where use sky portal.
Is this better to use sky portal in every interior scene.
can you send me the ink of tutorial of ‘rule of third’
I know these are so long ,but pls reply all.
Thanks
Hi Hina,
thanks to your feedback I improved the lesson: please check it again! I added 1 more example more about V-Ray Light Portals.
Always use it out of your windows! I tell you why in the lesson. Please, check it again 😉
PS I’ll update asap with 3rd rule!
http://www.grafica3dblog.it/index.php/2011/06/28/regola-dei-terzi-3ds-max.htm
This is an Italian lesson by Ciro…i think this could be pretty understandable even for those who doesn’t speak italian…
Hi Dario, thank you for the link! 😉
anyway I updated “CONCEPTS” with the link to the english lesson.. didn’t you liked it? XD
hai ciro
v ray material downloed link plz halp me……………………..
Hi Hamshim,
please, check the lesson#30 🙂
thinks for u i am very good in max because u help me by your lessones
Hi Ciro these days i have a lot of questions, so here is one of them 🙂 If we use Portal Lights + VRay Sun to shine the interior throug the windows, how we can reduce the stenght of VRay Sun without changing position of Sun? As we know, portal Lights don’t have possibility to change Multiplier. But in some positions VRay Sun is making overexposures in the interior, especially if Sun is very high on the sky. Thank you
Hi Drahus! The point is that Portal light doesn’t increase the brigtness, this increase a little bit just if you active “simple” option. Light Portal nees to create realistic shadows… without “portals” these shadows will be very smoothed and unperciptible. To get less light in your camera (as in the real world) you can use a different sun position (as you mentioned) or reduce your incomgin light setting “shutter speed”. In case you get some areas too dark that means you need to add “fill” lights to compensate light loss. This concept is really imporatnt to get realistic renders 🙂