In this lesson we will talk about Final Render and Post Production.

LESSON#34 – TOPICS:
- HD VIDEO / Narrated / 12′
- MAX FILES to download with all the V-Ray settings
- PSD FILE to download with all layers
- MAX FILES to try / exercise
- V-Ray Fur: easy and effective;
- Prepare the render for post production;
- Control the Alpha channel;
- Merge render with background;
- Light&Shade technique;
- Add flares and anharmonic flares;
- Control the details with Unsharp Mask;
- Grass replacement;
- Exercise:Â Create the same post production.
[private Premium|Premium-1year]
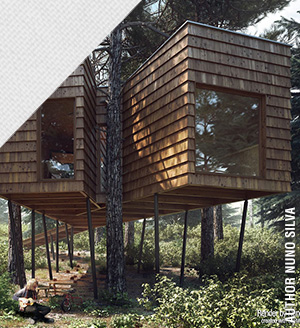
Final Render / Step 4
Before to talk about Final Render I want to highlight how simple and effective could be V-Ray Fur to add vegetation to your scene. Of course there are many ways to do that, with more complex and “beautiful” plugins like autograss or igrass. In this lesson I want to show you how simple and immediate is the tool V-Ray Fur: in this scene I just added it to a plane and applied a simple V-Ray material with only 1 texture in the diffuse channel.
It’s funny notice how the grass change look for different tilings. The color variation on the grass is directly related to the UVW Map so I suggest to run some tests to choose the better option:

Another important thing is preparing the render in relation to the post production we have planned. Of course you can also “improvise“, anyway the BETTER approach is figuring out the post production process we will run and preparing the final render with alpha channel and WireColor Element if you’re planning to replace sky and ground.
This is what I’m going to show you in the next video!
Post Production / Step 5
In this video I will show how to “prepare” the render and the post production process:
CONCEPTS:
- Use “invisible” V-Ray Light Dome to get alpha channel;
- Hide the plane to replace part of the background;
- Test and choose the better UVM map for V-Ray Fur;
- Ligh&Shade = new layer / 20% / Soft Light
- Paint black and white to darken and brighten;
- Add flares in “Screen” blending mode;
- Use a vibrant blue to create anharmonic effects (“soft light” blend mode)
- Use Unsharp mask 1px/80% Â to enhance details;
- Remember every post production should be almost invisible;
- Correct name for Michales Bay Flares is : “ANAMORPHIC FLARES” >Â google images
LIGHT&SHADE TECHNIQUE
This is a very “genlte” way to improve forms and contrasts in your image.
As I said in the video every good post production is never excessive, I define it almost “invisible”. If you need to work too much with post that probably means your image wasn’t good at start. Light&Shade is a great technique you can use to improve the contrast as if you were a painter:
- black > darken
- white > brighten
This is a classical example of this technique to “shade” a model’s nose:

Note: This photoretouch is almost invisible! If you cover the left image with your hand, you can’t understand the image on the right is retouched!
Â
 Â Exercise
 Exercise
Download and open the “Ready for Final Render” file you see below, which also includes the textures. Set up the parameters for FINAL RENDER as indicated in the 5SRW rules (also in lesson#2) and produce your render, complete with a correct alpha channel and wirecolor element. Than apply all post production concepts watched in the video:
Photoshop files:
[/private]
 / Also Learn Corona Renderer
thank you for the tips. if you can give us a video to create grass with Vrayfur.
thanks ciro
Great! the whole villa-T training is amazing! I can´t wait to apply it all to my own scene. Thank you so much for your help!
Mr. Ciro, can you provide another training for daylight exterior (big building such as highrise, office building or etc)
this lesson is amaziiiiiiing… thanks Ciro!
Tthank you for the tips.
Again amazing. I hate time i have to wait for another lesson…another days in pain before me.
Hi Drahoslav! Thank you for your appreciacion! 🙂 You also have to know that I work a loooot to get this result: I mean to get a so simple, quick and informative lesson. My goal is give you in 20 mins what you usually could learn in many hours. To do that I need to work a lot… so sorry for waiting but thank you for your trust! 🙂
Hi Ciro! We understand you are the best…
Hi Ciro,it was not a critic…let’s continue, you are doing it very well and everybody here, together with me are satisfied 🙂
Yew Drahoslav, don’t worry I got your point. I was just explaining since probably many people don’t know my way to work 🙂
Learning lesson by lesson!!! the best training I’ve ever done… graciaaaaas!!!!
Soooooo useful lesson! I’ll apply all your ideas on my works!!!
two thumbs up Ciro! 🙂
I’m still waiting for another great lessons from you, Ciro!!!! Well done and you have your own style, every part become more easy…….
Hi Ciro,
it’s amazing Post Production
Regards