In this lesson I’ll talk about Final Render and Post Production.

LESSON#37 – TOPICS:
- HD VIDEO / Narrated / 12′
- MAX FILES to download with all the V-Ray settings
- PSD FILES to download with all layers
- FINAL RENDER images to try / exercise
- Get alpha channel with V-Ray Dome;
- How to choose the right background;
- Evaluating perspective;
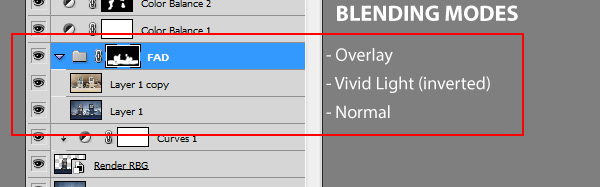
- FAD technique (extract hidden details);
- Creating the chromatic contrast;
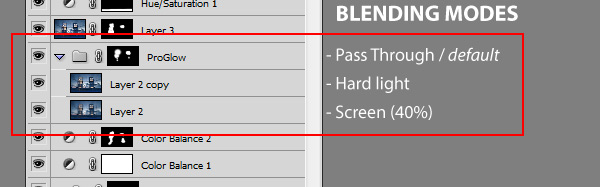
- PROGLOW technique;
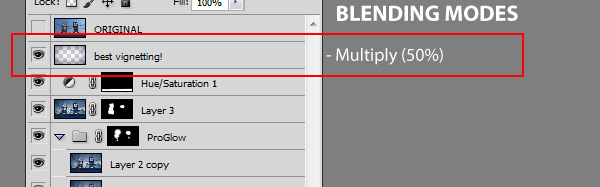
- Best VIGNETTING technique;
- Useful shortcuts for photoshop;
- No HDRI to achieve great result!
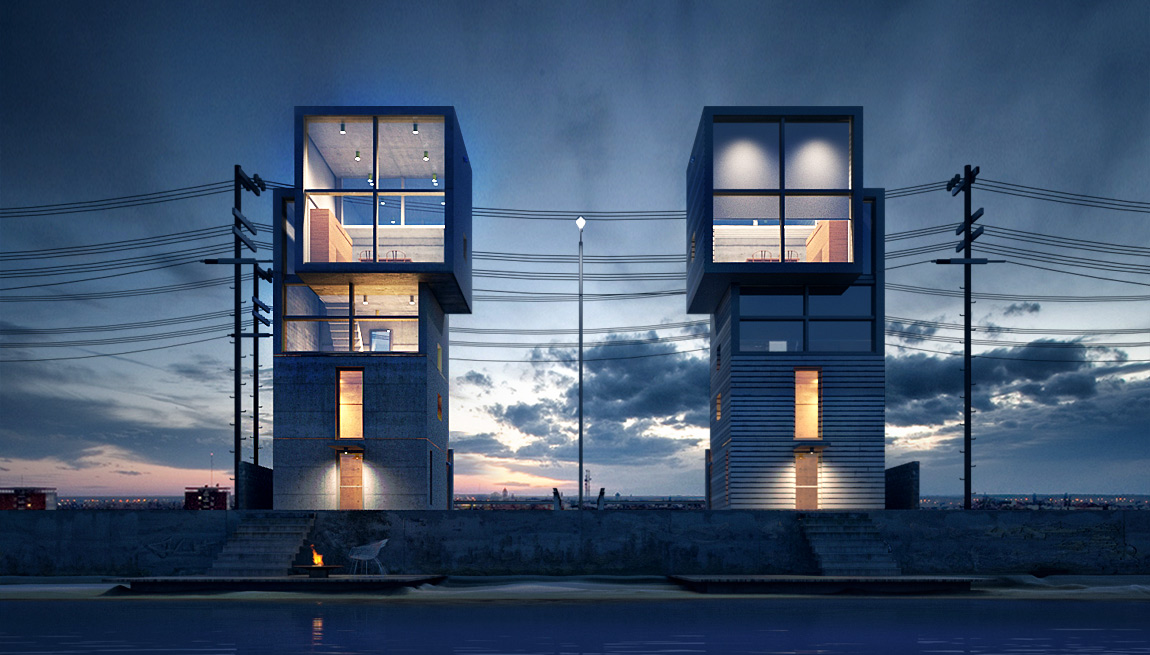
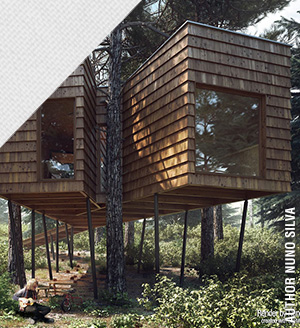
This is the image you’ll get at the end of this training:
[private Premium|Premium-1year]
Final & Post Production / Step 4-5
Too often people think that HDRI is absolutely needed to achieve a great final outcome. For sure HDRI is a great tool becasue this allow to use the same environmental information to get light, reflections and background. But if we use our head and we gain awareness about the whole process we can reach similar result without it.
This video is FULL of very important concepts and techniques.
Watch it very carefully to learn secret techniques that ONLY professional photoretouchers use:
 Â Â CONCEPTS:
  CONCEPTS:
- Use invisible option to get a correct alpha channel;
- Evaluate a coherent perspective for your background;
- Evaluate a coherent light direction for your background;
- Use FAD technique to extract incredible details;
- Use 2 Â “balance color” Â layers to create a chromatic contrast;
- Only for the warm balance use the mask to show only the parts you need;
- Use ProGLOW to add glow with no loss in details;
- use Best VIGNETTING to add an “invisible” vignetting to your render;
SHORTCUTS INCLUDED IN THE VIDEO:
- CTRL + ALT + SHIFT + E = create a new layer with all active layers;
- CTRL + J = duplicate selected layer;
- CTRL + G = create a group with selected layers;
- CTRL + I = Invert current layer;
- SHIFT + F6 = access feather selection window;
- ALT + create mask button = create a black mask;
Techniques illustrated in the video
FAD – Freaking Amazing Details
In this technique get details appling a Surface Blur filter to the “Vivid light” layer:
ProGLOW – Professional glow
In this technique add glow applying a Gaussian Blur filter to the “Screen” layer:
The best VIGNETTING of the world!
In this technique delete part of this layer using the Fether Selection option (SHIFT+F6):
 Â Exercise
 Exercise
To get the final render you can download and launch “4X4 final setting” – Instead, to directly carry out the post production exercise, download the images included in “Render + Background” pack and go on:
- 4×4 – Final Settings
- 4×4 – All textures (put in the same folder)
- 4×4 – RENDER + BACKGROUND
Download the FINAL version, to check on the PSD file all the layers:
[/private]
 / Also Learn Corona Renderer
As expected…. outstanding methods….!
thank you for the amazing techniques.
Great Ciro.. Keep more of those post production techniques coming.
They are so great and so effective.. 🙂
really nice 🙂 ,
Post production soo important & thease tips are amazing ,
Nice Its cool
superp tutorial
thanks alot
hi ciro! perfect video this work help me to improve my scene. a question this background image is a true hdri or only a photo internet. in any case which it is recommended to use
Hi Sandro, as you can see in the video this is just an image. The entire training is designed to show you that if you know what you want in your mind, you can use hdri or vraydome+vraysky+backgroundimage….it’s almost the same in many cases. Like this one.
incredible…..very useful…
Just Great!!!!!!
Photo master!! now I’m really learning photoshop!! thank you Ciro excellent technique
Hey, Сiro!
I can not download files to the project. Is this normal?
Hi Alexander.. I tried and it works. Did you already solved?
Hi Ciro,
when I save render in png. format with alpha channel & open in Photoshop,
the sky still there?
How I remove it ?
Verify that alpha channel option is enbled when saving in png.
Hi Ciro,
Alpha channel option is enable.
1st I render ,then save in png .format .in pop up dialogue box alpha channel is enable .then I open in Photoshop. but when open the image open with sky (means background is still there.)
tell me where i make mistake?
Tell me more… as “background” you mean vraysky or you (for instace) created a big plane with picture as beckground?