LESSON#40 – Final & Post (Step4-5)
- HD VIDEO / Narrated / 15′
- MAX FILES to download with all the V-Ray settings
- what is the bloom effect?
- How to simulate glare?
- V-Ray light spheres and VRayLensEffect;
- Control diffraction and star;
- Optimize GI for high-key and low-key images;
- Render Elements;
- General contrast and definition;
- Control overexposures.
This is the image you’ll be able to create at the end of this training:
[private Premium|Premium-1year]
Final Setup & Post Production – Step 4-5
How to add lens effect? There are many ways to do that, there are many photoshop plugins and we also learnt how to do simply add flares in the Lesson#24. A flare is basically composed by two components: Bloom (a bright halo) and Glare (the typical star effect). In this lesson I’ll show you how to add and control this effect directly in V-Ray using VRayLensEffect.
Watch the next video to learn more about complex materials in V-Ray:
 CONCEPTS:
- Add VRayLensEffect before the render starts;
- Use “update” button to check it;
- Use “glare type render camera” to control Glare;
- Higher f values produces bigger stars;
- Enable “diffraction” for a more realistic simulation;
- Optimize GI using low values for Low-key images;
- “Use Light Cache for Glossy Rays” reduce a little bit the render time;
- The VRayWireColor render elements is useful to create fast masks;
- Use a black layer in “HardMix” to check overexposures;
- Add Reflections layer in “Screen”;
- Unsharp Mask 80px / 30% > improve the general contrast;
- Unsharp Mask 1px / 80% > improve the definition.
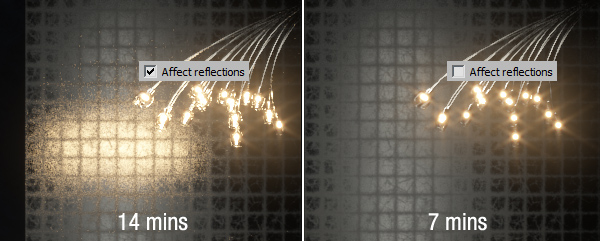
V-RAY LIGHT: DISABLE REFLECTIONS TO SAVE TIME.
As you know 5SRW promotes an absolute realistic approach: recreate the 3d scene as the reality is. That means we never do strange things like disabling reflections for a light since this is not real.
But is there cases in which to take advantage of not-real settings? Yes, to save render time: less reality often saves time. Do it espacially if this loss of realism is marginal.
In this scene all these V-Ray Light Sphere have an impact in the render time because of glossy reflections in the wall behind.
Disable Affect Reflections abd the image will be rendered much more clean and faster:

Future V-Ray Feature:
As you can see we unfortunatley lost the nice reflections on the glass! At Chaos Group developers are working to add this feature: “disable reflections for specific objects”. We just need to wait a little 😉
Note: Actually the same thing is with antialiasing. We could use “Adaptive subdivision” for final renders: less time… but less definition. Since we produce photorealistic-high-impact-images, as standard we use Adaptive DMC 1/40 as antialiasing for the final render (step4).
 EXERCISE:
In the link below download the final rener and render elements to produce the prost production as illustrated in the videos, especially keep attention on double usage of “UnSharp mask” and all different bleding modes for different render elements:
- Render and Render Elements (4 images)
Links to verify the final settings and post production:
- Dark Living – Ready for FINAL RENDER (max file)
- Final Post Production (Psd file)
[/private]
 / Also Learn Corona Renderer


good tips for VRayLensEffect and photoshop thnaks
does not play full
Hi Savio.. can you explain me better?
The most awesome lesson I’ve ever seen of post production, and very easy explanation!!
Thank You very much Ciro!!
Hi Ciro!
Excellent tutorials, many things about the program that i didn’t knew!
Hi Ciro.
There is missing link to this video on my private dashboard.
I can access it only via link from CG Blog support e-mail.
Add the link please. Thanks.
Jozef
Fixed 😉
Great!
awesome idol…
Great tips, very helpfull, Thank you . I bought your book i feel much comfortable about so many things right now ..
By the way, could you make a tutorial about rendering an axionometry ( like this http://www.google.fr/imgres?hl=fr&authuser=0&biw=1266&bih=896&tbm=isch&tbnid=Am7kgkVk1KJ2KM:&imgrefurl=http://www.3dvf.com/conceptark_10818.html/95046/&docid=mI4WrDQ4609QVM&imgurl=http://www.3dvf.com/DATA/galerie/artistes541/artist10818/4800fb9762.jpg&w=1922&h=1300&ei=73llUeGOBsOo0QXsuIGABA&zoom=1&iact=hc&vpx=89&vpy=196&dur=265&hovh=144&hovw=213&tx=150&ty=80&page=1&tbnh=142&tbnw=209&start=0&ndsp=31&ved=1t:429,r:1,s:0,i:88 )
I’m trying hard to find a tutorial but i don’t find any.
Kind regards
Thanks to your suggestion we scheduled a lesson about!